
In the world of leatherworking, few materials offer the same blend of efficiency and creativity as zuschneidfelle. While whole hides have their place in large-scale production, the seasoned artisan knows that the real magic happens when working with pre-cut, manageable pieces. These prepared sections of leather allow for greater control, less waste, and a more focused approach to small and medium-sized projects. Understanding how to select, handle, and cut these zuschneidfelle can elevate your craftsmanship from amateur to expert. Whether you are making wallets, bags, or decorative inlays, the strategic use of these tailored leather pieces is a game-changer.
What Exactly Are Zuschneidfelle?
The term zuschneidfelle originates from German craftsmanship, literally translating to “cut-to-size hides” or “cutting skins.” Unlike a full animal hide that might contain irregular edges, scars, or thin belly sections, zuschneidfelle are pre-selected portions of leather that have been trimmed into uniform shapes. These are typically rectangular or square pieces, often taken from the prime central area of the hide—the back or “butt” section—where the fiber density is highest and the surface is most consistent.
For the modern crafter, this means predictability. When you purchase a zuschneidfelle, you are paying for usable area, not for the irregular neck or leg sections that would otherwise end up as scrap. This makes them ideal for pattern cutting, especially for items that require multiple identical parts. Manufacturers often grade these pieces by thickness, tanning method, and finish, ensuring that every zuschneidfelle in a batch meets the same standard.
Why Choose Pre-Cut Leather Over Whole Hides?
Many beginners assume that buying a whole hide is more economical. However, when you factor in waste, storage, and cutting time, zuschneidfelle often prove superior for specific applications. A whole cowhide can measure over 50 square feet, requiring significant workspace and specialized tools to break down. In contrast, zuschneidfelle are compact, often ranging from 0.5 to 10 square feet. They fit easily on a standard workbench and can be stored flat without curling.
Furthermore, quality control is simpler. With a whole hide, you might discover a branding mark, a tick bite scar, or a loose grain pattern in the middle of your project. With zuschneidfelle, the supplier has already removed these defects. This consistency is critical for commercial crafters who sell their goods; every product cut from the same batch of zuschneidfelle will look and feel identical, building brand reliability.
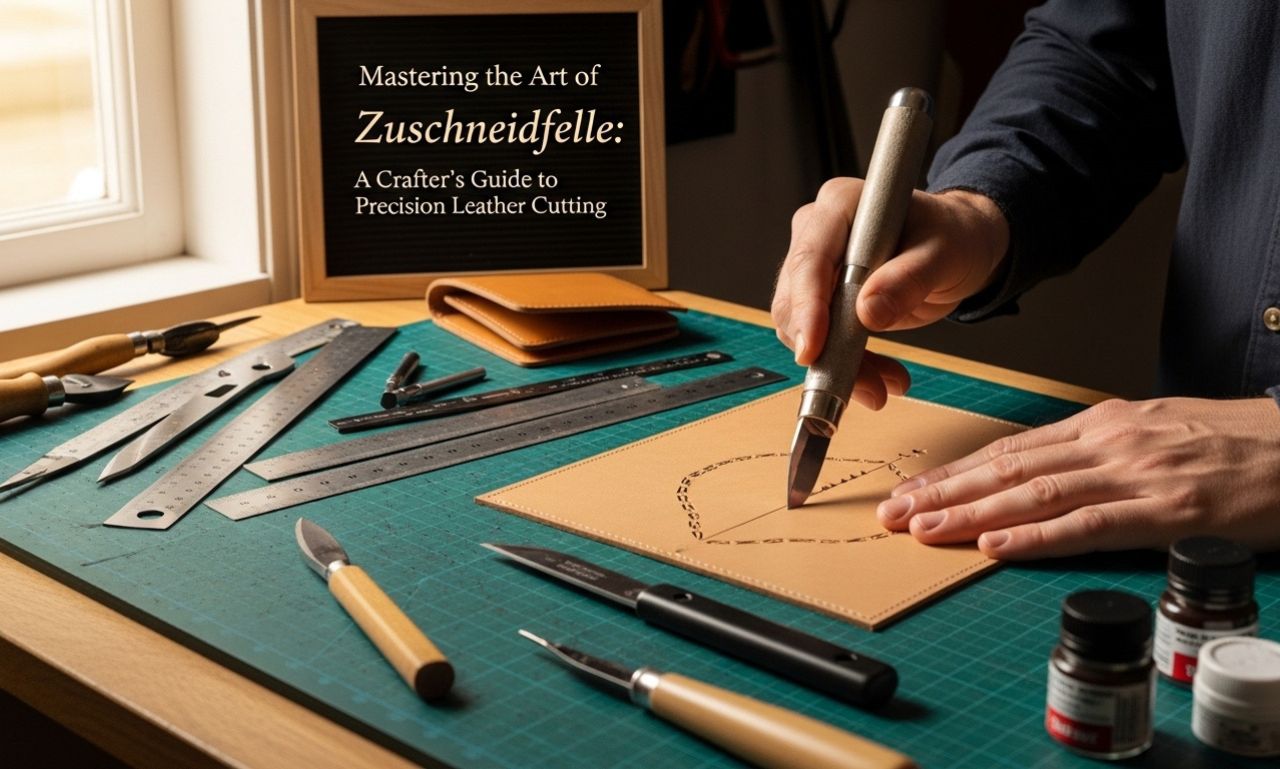
Essential Tools for Cutting Zuschneidfelle
To work effectively with zuschneidfelle, you need more than just a sharp blade. Because these pieces are often smaller and more precisely dimensioned than whole hides, your cutting technique must be equally precise. A rotary cutter with a fresh blade is excellent for straight lines on soft leathers. For curved patterns on stiffer zuschneidfelle, a swivel knife or a precision craft knife with a #11 blade offers superior control.
A self-healing cutting mat is non-negotiable. Since zuschneidfelle are pre-cut, you will frequently be cutting them into even smaller components. The mat protects your blade and your table. Additionally, a stainless steel ruler with a cork backing prevents slipping when you apply pressure. Do not forget a pair of heavy-duty scissors for trimming threads or rough edges, though scissors should never replace a knife for primary cuts on zuschneidfelle—they tend to crush the leather’s fiber structure.
Step-by-Step Cutting Techniques
Mastering the cut is where skill meets material. Follow this sequence for flawless results with any zuschneidfelle:
-
Inspect the Piece: Lay your zuschneidfelle on a clean, flat surface under good light. Run your hand over the grain side to feel for any bumps or hard spots. Check the flesh side (the underside) for loose fibers. Mark any imperfections with chalk so you can cut around them.
-
Secure the Leather: Even a small zuschneidfelle can shift during cutting. Use painter’s tape along the edges or place a few light weights (like small metal discs or ceramic coasters) on the areas that will become waste. Avoid pinning through the leather unless it is a heavy harness type, as holes will remain.
-
Transfer Your Pattern: Use a silver gel pen or a wax-based leather marker to trace your pattern onto the grain side. For dark zuschneidfelle, a white charcoal pencil works well. Remember that ballpoint pens leave permanent indentations.
-
Execute the Cut: Hold your knife at a 90-degree angle to the leather surface. Draw the blade toward you using your shoulder, not your wrist. For straight cuts on a zuschneidfelle, a single firm pass is better than multiple light scores, which can create a ragged edge. For curves, rotate the leather, not the knife.
-
Bevel the Edge (Optional): After cutting your shape from the zuschneidfelle, you may wish to bevel the cut edge with an edge beveler tool. This removes the sharp 90-degree corner, preparing the leather for burnishing.
Common Mistakes When Using Zuschneidfelle
Even experienced leatherworkers fall into traps with these convenient materials. One frequent error is ignoring the grain direction. Leather has a natural stretch—more across the spine than along it. When cutting multiple parts from a single zuschneidfelle, always orient pattern pieces in the same direction relative to the spine line (even if the spine is no longer visible, the supplier usually marks it). Otherwise, your finished product may warp or stretch unevenly.
Another mistake is pressing too hard. Because zuschneidfelle are often softer and more flexible than whole hide sections (as they may come from shoulder or belly areas), excessive knife pressure can compress the leather, causing the cut line to drift. Let the sharpness of the blade do the work. A dull blade is the number one cause of ruined zuschneidfelle—it tears fibers instead of slicing them, leaving a fuzzy edge that cannot be burnished smooth.
Storage and Preservation of Cut Pieces
Once you have cut your components from a zuschneidfelle, proper storage ensures the remaining material stays usable. Never fold leather. Instead, lay leftover zuschneidfelle flat between sheets of acid-free paper or clean cotton cloth. Store them horizontally in a cool, dry place away from direct sunlight, which can fade dyes and dry out natural oils. For long-term storage, avoid plastic bags, as trapped humidity encourages mold. A breathable canvas tote or a cardboard box with ventilation holes is ideal.
Label each leftover zuschneidfelle with its thickness (in millimeters or ounces), leather type (e.g., veg-tan, chrome-tanned, oil-tanned), and color. This simple habit saves hours of searching later. Some crafters even keep a “scrap binder” where they tape small swatches of every zuschneidfelle they have used, along with notes on its temper and best application.
Creative Projects for Zuschneidfelle
The true beauty of zuschneidfelle lies in their project versatility. Small pieces are perfect for watch straps, key fobs, and eyeglass cases. Medium-sized zuschneidfelle (around 2-3 square feet) can yield a complete clutch bag, a set of coasters, or a tooled belt. Larger pieces are ideal for journal covers, holsters, or the back panel of a backpack.
Because zuschneidfelle are already flattened and trimmed, they also excel at experimental techniques like wet-molding (soaking the leather and pressing it over a form) or leather carving. Without the variable thickness of a whole hide, your tooling impressions will come out uniform across the entire piece. For beginners, starting with a cheap, firm zuschneidfelle of veg-tanned leather is the fastest way to learn stitching, riveting, and edge finishing without the intimidation of a full hide.
Conclusion
The shift from wrestling with whole hides to confidently selecting zuschneidfelle marks a significant step in any leatherworker’s journey. These pre-cut treasures offer a perfect balance of quality, convenience, and creative control. By understanding their characteristics, using the right tools, and applying proper cutting techniques, you can reduce waste, save time, and produce professional-grade items from the very first attempt. Whether you are a weekend hobbyist or a full-time maker, embracing zuschneidfelle means embracing precision. So next time you plan a project, skip the unwieldy hide and reach for a perfectly sized zuschneidfelle—your scissors, your workbench, and your finished product will thank you.